
Navigation
Install the app
How to install the app on iOS
Follow along with the video below to see how to install our site as a web app on your home screen.
Note: This feature may not be available in some browsers.
More options
You are using an out of date browser. It may not display this or other websites correctly.
You should upgrade or use an alternative browser.
You should upgrade or use an alternative browser.
Kraton So I Bought a Kraton...
- Thread starter Elk
- Start date
This site may earn a commission from merchant affiliate
links, including eBay, Amazon, and others.
links, including eBay, Amazon, and others.
- Messages
- 1,154
- Reaction score
- 1,084
- Arrma RC's
Wow, that's going to be a project. I would like to see you start a Build thread in the build log forum.
justpassedu
Active Member
Well best of luck , 1st thing I'd do is grab a new chassis and the rest of the parts needed to get it going .
jonUF02
Active Member
Looks beat to crap. I started with something not quite this bad because I wanted to build it my way, then when I finished I realized I would have been better off buying a new one and strip/sell the stock electronics and buy what I wanted to replace them. Little parts add up.
disturbedfuel15
Geek Extraordinaire!
Wow. Well, you are going to get to know your truck to say the least.
Yeah, that looks rough, but it can be fixed. The chassis is ugly, but really, scratches on the bottom don't make it slower. If it is not bent. don't sweat it. No battery box seems odd, but gives you a great chance to buy the better Outcast battery box.
To me, the big money worry will be the diffs. This truck has been run a lot, by the looks of it. Pull all three diffs, open them up (keep the gear sets separate) and check the main ring gear and the internal bevel gear / sun gears for "shark teeth" - replace as a set necessary. (As a set - I mean, if the ring gear looks worn, replace it and the diff pinion. If the sun get is worn, replace both and the planetary gears for that diff.) If the gears look good, reassemble with shims.
Last - check the front hubs. If they are V1, replace them (and the red front hex's) with V2. The V1 hubs eat the big ring bearings.
- Messages
- 1,154
- Reaction score
- 1,084
- Arrma RC's
~jYou can do it low budget, but you'll need to Ebay the parts.
here are the front and rear differentials with gearbox, bearings, and outdrives
http://www.ebay.com/itm/Arrma-Krato...484624&hash=item58dd320309:g:qsUAAOSw9eVXXXcd
Center differential
http://www.ebay.com/itm/Arrma-Krato...487310&hash=item1c6892b9ff:g:cBwAAOSwqBJXXXy~
Motor mount, center diff mount and the top center diff brace
http://www.ebay.com/itm/Arrma-Outca...603040&hash=item211baac030:g:1tsAAOSwnHZYQMZG
Outcast battery tray
http://www.ebay.com/itm/Arrma-Batte...803293&hash=item3f7a665216:g:uUkAAOSwRUhY9qQA
Motor and ESC
http://www.ebay.com/itm/Arrma-BLX18...548268&hash=item211140aa8d:g:tRMAAOSwtJZXXelX
Full set of Kraton Screws
http://www.ebay.com/itm/Arrma-Talio...%3A421a5a4a15d0abda4bc1100bfffa8b4d%7Ciid%3A1
That puts you at $275 and you need a servo too. I did not link to the stock servo because it sucks. You can find better servos for a few dollars more. And a servo arm too.
If you want I have the Kraton Battery tray, and receiver box I could send you, if you are in the US. Just "pay it forward" on the shipping costs. Someday someone will need something you don't, give it to them.
Cool breeze bro, gotta get back to work.
Dpricenator- great post! I was looking for that first link a month ago. That is a great deal on a full diff + case.
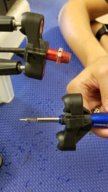
Also, took a pic for the op - the hub on the truck is V1, the loose one is V2. Note that because it is wider, you also need a set of the narrow red wheel hex (which I forgot to order... grrr...)
Also, took a pic for the op - the hub on the truck is V1, the loose one is V2. Note that because it is wider, you also need a set of the narrow red wheel hex (which I forgot to order... grrr...)
Attachments
- Messages
- 1,154
- Reaction score
- 1,084
- Arrma RC's
Thanks @Jerry-rigged I bought that set twice just because I knew I didn't want to wait for it later. I took them all apart and shimmed them, filled with appropriate diff fluid and labled for use later on. I just pulled the first one out last night, and am going to start the replacement process today at lunch. Not sure how much I can get done out of the back of my car, But I have to keep busy so I don't eat a 1000 calorie lunch.
And here is a link for the front and rear hubs, with bearings, pillow balls and the red nuts.
http://www.ebay.com/itm/Arrma-KRATO...312335&hash=item5b2e6e5b97:g:8d4AAOSw5cNYJj8S
And for the actual hubs/hexes
http://www.ebay.com/itm/Arrma-OUTCA...e=STRK:MEBIDX:IT&_trksid=p2060353.m2749.l2649
And here is a link for the front and rear hubs, with bearings, pillow balls and the red nuts.
http://www.ebay.com/itm/Arrma-KRATO...312335&hash=item5b2e6e5b97:g:8d4AAOSw5cNYJj8S
And for the actual hubs/hexes
http://www.ebay.com/itm/Arrma-OUTCA...e=STRK:MEBIDX:IT&_trksid=p2060353.m2749.l2649
More pictures. Ring gear is slightly sharp tooth. Pinion is completely worn-out. This same shark tooth look can happen to the Sun gears inside the Diff also. Yes, my son and I are doing this repair today. Lol 

- Thread starter
- #15
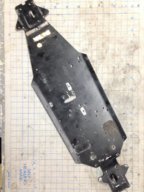
I received the truck today, and proceeded to immediately rip it apart and run the parts through the heated ultra-sonic cleaner. The PO appears to have used black silicone all over the screws on the bottom of the chassis.


@Jerry-rigged, thanks for the clarification on V1 vs. V2 hubs, that was quite useful.
@Jerry-rigged, thanks for the clarification on V1 vs. V2 hubs, that was quite useful.
disturbedfuel15
Geek Extraordinaire!
Lmao every time I look at this thread... Whew. You are a trooper for diving in to this project. Good for you. I feel like you adopted the most troubled animal in the shelter. As we know, there is hope! Like I said, you'll definitely get to know your truck! This is a good thing. I just can't believe the seller did not at least clean it for you before shipping. Literally left a huge glob of mud on it. He probably could have saved shipping costs by cleaning it first lol.
Oh, i actually have something productive to say. Take a look at chassis wraps. It will cover up all those scratches =)
Oh, i actually have something productive to say. Take a look at chassis wraps. It will cover up all those scratches =)
- Thread starter
- #17
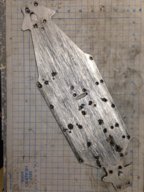
The chassis was fairly straight. The only slight bend was at a droop limit tab. I think I took care of it pretty well in the vise.
Then a quick run over both sides with a wire wheel and a machinists file along the edges.
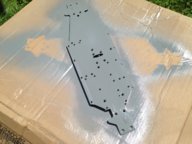
Followed by a quick shot with some machine gray paint I had sitting around.
Attachments
disturbedfuel15
Geek Extraordinaire!
Looking good!
- Thread starter
- #19
These pins look a little worn.
Time to clean them and check for any bent hinge pins.
One was a little off, but some careful bending in the vise brought it back close to perfect.
Most of the parts coming from the ultrasonic cleaner. Only a few more to go.
- Messages
- 1,154
- Reaction score
- 1,084
- Arrma RC's
Wow bro, that's going better than I expected. Pretty cool to have a whole section of the forum cheering you on as you bring the Kraton back to life. Chassis looks good in Grey, but dang the brushed aluminum look was pretty cool too. That Stock servo mount is a MUST upgrade.
To help keep your costs low, you could do the DIY aluminum brace. I have the top piece, and all you would need are the vertical posts for it. Again, If you want, I'll send it too you, free of any costs. If you are diving in this deep, I have no problem helping a guy out. Hit me with a PM, and I can get a few of these things out to you.
To help keep your costs low, you could do the DIY aluminum brace. I have the top piece, and all you would need are the vertical posts for it. Again, If you want, I'll send it too you, free of any costs. If you are diving in this deep, I have no problem helping a guy out. Hit me with a PM, and I can get a few of these things out to you.