Kraton Craigslist rebuild for a feller

This site may earn a commission from merchant affiliate
links, including eBay, Amazon, and others.

calebgilmore

Premium Member!
Premium Member
Messages
1,614
Reaction score
2,237
Arrma RC's
  1. Granite
  2. Infraction
  3. Kraton 8S
  4. Kraton 6s
  5. Mojave
  6. Notorious
  7. Outcast 6s
  8. Senton 6s
  9. Talion
  10. Typhon 6s
  11. Vorteks
  12. Voltage
Pulled my third 6s arrma out of the hoarder cave and gave it the whatnot. It was my first from scratch build and it showed :LOL: i'm not too hard on my stuff but i do hose it off and let it air dry, which of course will wreak havoc on the screws.
IMG_4577.jpg


First order of business was taking the front end off. I like to knock it out first since it's the most involved.. Found out the 2 usual issues i run into on other builds got me too. The small m3 screws in the front lower rear hinge pin block were stripped out, and one of the steering pillar bolts was too loctited in to get out. I ended up having to drill out the heads of the two m3 screws and use my vampliers and some heat to get the small ones out. I pulled the steering assembly and front end up and off and then used my channel locks and more heat to get the m4 screw out of the pillar.
IMG_4581.jpg

IMG_4582.jpg

IMG_4583.jpg

IMG_4584.jpg

IMG_4585.jpg

Took the whole front end apart and cleaned out the diff/washed off the parts. Found the front diff pinion cup was loose and came right off so good catch there. Also found the front arms had the classic rpm arm bend to them. I looked in my stash and came across a brand new set of v4 kraton arms so on they went.
IMG_4587.jpg

IMG_4588.jpg

IMG_4589.jpg

I did pull the m2c droop screws out of the rpm's and transferred them over to the new old arms.
IMG_4590.jpg

Next up was diff servicing. Added a shim on the outside by the bearing to both sides and cleaned out the old fluid and refilled with 60k. Tekjo gaskets are awesome (not a sponsor but i need them to be :LOL: ) and i replaced them while i was in there.
IMG_4591.jpg

IMG_4592.jpg

Put the pinion back in after checking the bearings and made sure to loctite the grub screw on the cup and put the diff back together checking mesh between the pinion and ring gear. The front felt good so back together the rest of the front went. I know when i cartwheeled 7 miles with this truck one of the pillow balls popped out so i wanted to swap the hubs out so the new owner won't have that issue happen due to me. It's on them if they do the same and it pops out on a new hub :LOL: This truck has CRCU hinge pin blocks on it and a just bash it upper plate along with the m2c ackerman bar. The hinge pins weren't bent but were pretty rough from age and being ran hard and put up wet so new ones went in, and the bushings came out of the steering and bearings went in.
IMG_4594.jpg

IMG_4595.jpg

IMG_4596.jpg

Apparently i can only upload 15 uploads per post.... I'll start a part 2.
 
Pulled my third 6s arrma out of the hoarder cave and gave it the whatnot. It was my first from scratch build and it showed :LOL: i'm not too hard on my stuff but i do hose it off and let it air dry, which of course will wreak havoc on the screws.
View attachment 372179

First order of business was taking the front end off. I like to knock it out first since it's the most involved.. Found out the 2 usual issues i run into on other builds got me too. The small m3 screws in the front lower rear hinge pin block were stripped out, and one of the steering pillar bolts was too loctited in to get out. I ended up having to drill out the heads of the two m3 screws and use my vampliers and some heat to get the small ones out. I pulled the steering assembly and front end up and off and then used my channel locks and more heat to get the m4 screw out of the pillar.
View attachment 372180
View attachment 372181
View attachment 372182
View attachment 372183
View attachment 372184
Took the whole front end apart and cleaned out the diff/washed off the parts. Found the front diff pinion cup was loose and came right off so good catch there. Also found the front arms had the classic rpm arm bend to them. I looked in my stash and came across a brand new set of v4 kraton arms so on they went.
View attachment 372185
View attachment 372186
View attachment 372187
I did pull the m2c droop screws out of the rpm's and transferred them over to the new old arms.
View attachment 372188
Next up was diff servicing. Added a shim on the outside by the bearing to both sides and cleaned out the old fluid and refilled with 60k. Tekjo gaskets are awesome (not a sponsor but i need them to be :LOL: ) and i replaced them while i was in there.
View attachment 372189
View attachment 372190
Put the pinion back in after checking the bearings and made sure to loctite the grub screw on the cup and put the diff back together checking mesh between the pinion and ring gear. The front felt good so back together the rest of the front went. I know when i cartwheeled 7 miles with this truck one of the pillow balls popped out so i wanted to swap the hubs out so the new owner won't have that issue happen due to me. It's on them if they do the same and it pops out on a new hub :LOL: This truck has CRCU hinge pin blocks on it and a just bash it upper plate along with the m2c ackerman bar. The hinge pins weren't bent but were pretty rough from age and being ran hard and put up wet so new ones went in, and the bushings came out of the steering and bearings went in.
View attachment 372191
View attachment 372192
View attachment 372193
Apparently i can only upload 15 uploads per post.... I'll start a part 2.

Sir,
You have an interesting workbench area.. Right above your medicine cabinet...?
 
If you don't have the m2c tool for pulling the ends of the hubs out you are missing out. I cross threaded several early on in my days of cutting my teeth on these trucks. You can feel when you have it right with it and it's def worth the money.
IMG_4598.jpg

IMG_4599.jpg

With that i reassembled the front end and trashed all the rusty screws because i know rcbuzz was twitching over the pics so far :LOL: Next up was to pull the center diff out and service it. Again it took an extra shim on both sides and got a new tekjo gasket and 1m weight fluid. I was running 20/46 on the previous setup but since i was going to a 1780kv motor from a 1480 i bumped the spur back up to a 50t and stayed with the 20t pinon.
IMG_4601.jpg

The chassis got a good cleanup and then it was time to work the rear end. I did the same stuff on the rear, replacing the arms with stock v4 and put new hinge pins and the m2c droop screws in. The rear bearings were pretty crusty and didn't feel smooth at all so they got replaced, and i cleaned up the dogbones a little with wd40 and a toothbrush. Of course i like the tekjo bulkhead to chassis gaskets too so a fresh one went on the front and rear. The pinon on the rear was definitely not coming off so it got the butane hex applied to it after i got the grub screw out to loosen up the loctite and off it came. The rear diff had a little more play in the cup side pin and had actually broken the pin behind the sun gear so it got 2 shims behind the sun gear on the cup side and then refilled with 30k fluid.
IMG_4607.jpg

IMG_4608.jpg

IMG_4609.jpg

While digging for arms in my stash i found a better front rpm bumper and a rear wing/mount that were in better shape so they got swapped out. The old wing arms were buckled in and strangely the one i pulled out of the stash is tweaked to one side. I can only assume that's because it was jammed in the bin and got bent and stayed that way til i came across it again...
IMG_4605.jpg

IMG_4610.jpg

Out came the 1480 and after cleaning the center diff mount in went the 1780 v2 4292 hobbystar
IMG_4612.jpg

On went the max 6 with a factory fan setup on it again instead of the old 12v fan and mount and back on with the jbi servo mount and new screws. Also swapped on a v5 battery tray/receiver box for the added room and new side skirts i also came across. Powered up the new combo and calibrated the dumbo rx/tx to it (had an old v4 stock spektrum radio before) and re programmed the max6 since of course it was backwards with the new motor. Buttoned everything up and here it sits. Spent 7 hours tearing it apart and cleaning it up/fixing/upgrading parts of it. Is it still a little crusty? yep. is it perfect? nope. but it should take a beating. Only changes i'd make would be the exb turnbuckles and a stronger servo running 7.4v but i built red rocket and it has all that and more on it so it's time for this one to get someone else started in the hobby. (y)
IMG_4616.jpg

IMG_4619.jpg

IMG_4617.jpg

IMG_4618.jpg


Sir,
You have an interesting workbench area.. Right above your medicine cabinet...?
Coffee table/medicine cabinet/rc work bench/nail polish holder/foot rest, you name it

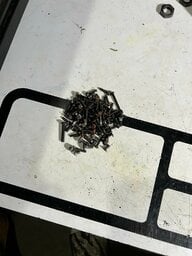
The pile of rusty screws that came out
 

Attachments

  • IMG_4615.jpg
    IMG_4615.jpg
    324.5 KB · Views: 15
If you don't have the m2c tool for pulling the ends of the hubs out you are missing out. I cross threaded several early on in my days of cutting my teeth on these trucks. You can feel when you have it right with it and it's def worth the money. View attachment 372194
View attachment 372195
With that i reassembled the front end and trashed all the rusty screws because i know rcbuzz was twitching over the pics so far :LOL: Next up was to pull the center diff out and service it. Again it took an extra shim on both sides and got a new tekjo gasket and 1m weight fluid. I was running 20/46 on the previous setup but since i was going to a 1780kv motor from a 1480 i bumped the spur back up to a 50t and stayed with the 20t pinon.
View attachment 372196
The chassis got a good cleanup and then it was time to work the rear end. I did the same stuff on the rear, replacing the arms with stock v4 and put new hinge pins and the m2c droop screws in. The rear bearings were pretty crusty and didn't feel smooth at all so they got replaced, and i cleaned up the dogbones a little with wd40 and a toothbrush. Of course i like the tekjo bulkhead to chassis gaskets too so a fresh one went on the front and rear. The pinon on the rear was definitely not coming off so it got the butane hex applied to it after i got the grub screw out to loosen up the loctite and off it came. The rear diff had a little more play in the cup side pin and had actually broken the pin behind the sun gear so it got 2 shims behind the sun gear on the cup side and then refilled with 30k fluid.
View attachment 372197
View attachment 372198
View attachment 372199
While digging for arms in my stash i found a better front rpm bumper and a rear wing/mount that were in better shape so they got swapped out. The old wing arms were buckled in and strangely the one i pulled out of the stash is tweaked to one side. I can only assume that's because it was jammed in the bin and got bent and stayed that way til i came across it again...
View attachment 372200
View attachment 372201
Out came the 1480 and after cleaning the center diff mount in went the 1780 v2 4292 hobbystar
View attachment 372202
On went the max 6 with a factory fan setup on it again instead of the old 12v fan and mount and back on with the jbi servo mount and new screws. Also swapped on a v5 battery tray/receiver box for the added room and new side skirts i also came across. Powered up the new combo and calibrated the dumbo rx/tx to it (had an old v4 stock spektrum radio before) and re programmed the max6 since of course it was backwards with the new motor. Buttoned everything up and here it sits. Spent 7 hours tearing it apart and cleaning it up/fixing/upgrading parts of it. Is it still a little crusty? yep. is it perfect? nope. but it should take a beating. Only changes i'd make would be the exb turnbuckles and a stronger servo running 7.4v but i built red rocket and it has all that and more on it so it's time for this one to get someone else started in the hobby. (y)
View attachment 372203
View attachment 372204
View attachment 372205
View attachment 372206


Coffee table/medicine cabinet/rc work bench/nail polish holder/foot rest, you name it

The pile of rusty screws that came out

IMG_4615.jpg


Now you can melt it all down and forge some new hinge pins.. 🤣
 
👏 what a nice rebuild!!

Seeing new life brought into old equipment is fantastic! Thanks for taking the time to write this up.

I was surprised to see the RPM arms droop so much, I guess that flexibility comes at a cost.
 
👏 what a nice rebuild!!

Seeing new life brought into old equipment is fantastic! Thanks for taking the time to write this up.

I was surprised to see the RPM arms droop so much, I guess that flexibility comes at a cost.
Yeah i need to pull my beefcake talion out and update it with the new arms. Guess we'll see how far off the geometry is with new arms and the old talion towers.
 
The Vamplier's also look pretty cool. :cool:

Curious on the motor change, was the 1480kv too low for this rig? Or just making it 💪 for the next person?
 
The Vamplier's also look pretty cool. :cool:

Curious on the motor change, was the 1480kv too low for this rig? Or just making it 💪 for the next person?
Think i saw someone somewhere ask or say it could take 8s, but i figured i'd get it into more respectable gearing and still have some speed. I hit 62 with the 1480kv motor on 20/46 gearing on my gravel road, so i'd assume it has to be close to that still off road with this motor/gearing. I need to look on rcjuice and see what it says about this motor. I couldn't get a 1730 at the time with them being sold out so I opted for the 1480 when i got it.

The Vamplier's also look pretty cool. :cool:

Curious on the motor change, was the 1480kv too low for this rig? Or just making it 💪 for the next person?
Oh yeah, and the vampliers are designed to remove broken or stuck screws. The teeth in the middle are turned 90 degrees so it grips the head or shaft. oooooh yeah......
 
People seem to really like the V1 RCjuice motors.
 
People seem to really like the V1 RCjuice motors.
Yeah someone on fb said they liked them better than the v2's too, but with me running g2 max6 combos i might as well include a new motor instead of a used one since i have it
 
Back
Top