Outcast Steering binding

This site may earn a commission from merchant affiliate
links, including eBay, Amazon, and others.

firehawk_77

Active Member
Messages
32
Reaction score
10
Location
Florida
Arrma RC's
Hey everyone,
I am new to the Outcast, but not RC's in general. After my first bash I managed to break the right front lower a arm. Several days later and I've replaced the front with RPM upper and lowers on the front and put a Voltage servo mount in. I just finished buttoning everything up and turned on the TX and RX. Nothing seemed amiss but when I tried to turn the servo saver moved up not the tires. I tried to see if anything I installed could cause the binding but I'm at a loss. With the power off it's difficult to move the tires but it can be done, but not under power. I'm at the point of taking it apart all the way, but hoping someone on here has experienced something like this and could point me to something I'm missing.
 
Ok, I feel really stupid now... I had cranked down on the pillow ball retaining screws a little too much and as soon as I loosened them bam, I'm steering again... thanks! Boy do I feel silly!

Dum Dum Strikes again!

Man, I thought I had everything fixed and then I decided to run it in my back yard through low, slightly wet grass just to make sure. Well everything was going good and then I stopped to talk to my neighbor who was asking me questions about it when he noticed it was smoking under the body.
Now I have no steering but the truck still will run... So, what's the best replacement servo and do I need a BEC for it? ARGH!!! Just when I think I get it right something else breaks...
 
Last edited:
So the servo burnt up? Lots of Options. Savox is a good brand, as is Hi-tech. I use the Savox 1210SG it water proof and plenty of torque. The 1256 is the same torque not water proof and cheaper. Probably 7-8 different Savox Servos are one peoples Outcasts and Kratons. Search through the threads here and then search the web for the one you want. Easy swap, except the run the servo wires under the ESC tray. so you have to take that out too. or just cut the wires on the stock servo, and drop the new one in.
 
So the servo burnt up?
As far as I can tell yes the Servo is done. I'm just not having luck with this truck. I know it's just me but I haven't really beaten on it yet to get these breakages. (Ok whine done!)
I'm going with the 1210SG. Thanks for the advice on routing the wires. Is the Glitch buster necessary for this servo? Or is just insurance? I'm running stock with 6S.
 
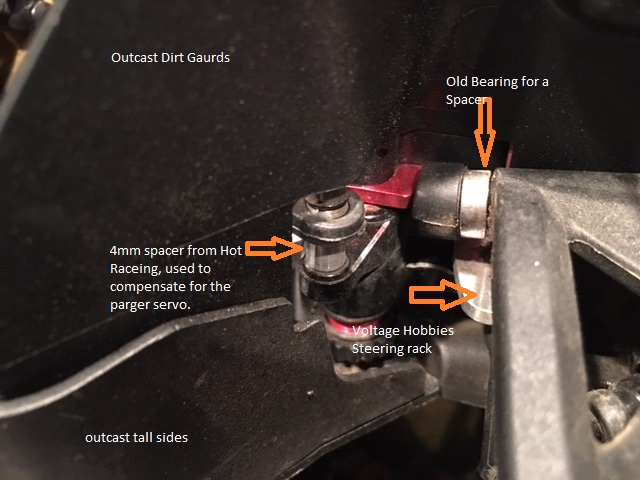
I am not running a glitch buster and have not had an issue. Before you commit, I want to tell you something. I am using a GKA servo mount. It fits very snuggly around the case of the servo. Since the Wires, form the servo, protrude from the middle of the servo I was not able to just drop it in. I had to remove the servo mount, and take the top of the servo off. The slide the bottom of the servo under into the mount from the underside, then reassemble the servo with it already in the mount, Then attach the mount to the car. You will also need some small 3 or 4mm spacers due to it being slightly taller than the stock servo. Hot racing sells a little space selection, that I used, but any spacer will work. Here are a couple pics of mine.

 
Thanks for that! I went with Voltage's alum servo mount instead of GKA but I assume they are the same.
So, you are saying with the Savox and everything, the spacers are necessary in order for everything to work?
Good to know I appreciate the help as I already pulled the trigger on the Savox.
I'll update once I get everything...
 
The savox 1210SG is 4MM taller than the stock servo. So there is a spacer needed on the far end of the linkage from the servo horn to the bellcrank/servo saver.

In case you do have to take the servo apart. Start by removing the screw in the middle of the Spline on top. Then a flat blade screw driver to pry/lift the spline off the servo. Then remove the 4 corner screws from the bottom of the servo. The top (black) half should separate from the bottom Blue half. Then reassemble with the mount. I forgot, I also used the small 2mm spacers to help lift the servo off the chassis plate. These are also marked in the photos above.
 
Ok thanks! I appreciate you saving me an early headache with the servo being bigger than stock. Can I just get a 4mm space from the local hardware store or does it have to be hot racing spacers? Also why did you lift the servo up with the 2mm spacers? If I don't use them would that mean I only need a 2mm spacer on the far end of the linkage?
Thanks for the info on taking the servo apart. I'm not eager to do that, but I'll wait and see once I get it before I decide what to do with it and the servo mount.
I really appreciate your help here!
 
The servo is not hard at all. I figured it out with out a tutorial, so I am sure you will be fine.

Any Spacer will do, I used an old bearing on my front Upper A-Arm, after I lost the stock plastic pacers.

I lifted the servo off the chassis, because I figured having it float on the rubber spacers would give it just a micron of shock absorption. That way when it lands from 15 feet and the chassis slaps the ground, the servo takes less of a jolt.

Your best bet is to put it in and see where your linkage lines up. I know there are a couple guys that did not use a spacer at all. And their linkage is only at a slight angle.
 
Thanks! I appreciate the help with this! I'll get the servo hopefully by Friday. I don't have anything around me that will allow me to to launch this truck 15ft, so I might be alright.
 
Ok, I got the servo last night and tbh it was pretty much a straight swap out. Two things I did notice was that the servo wire is much shorter than stock, which meant I didn't really have enough wire to route it with the ESC under that platform. Also the wire on the Savox is in the middle of the bottom body, not on the bottom like stock, so I had to "shape" the wire so it didn't wrap itself around the driveshaft and stayed on the bottom of the chassis.
Otherwise it was a straight in and out replacement. I do have the Glitch Buster, but did not put it in as I'm not sure I really need it, may put in later as I still hear a servo whine when standing still.
I do need to probably replace the bushings in the steering rack and have some Fast Eddie's on the way... I just wish they'd separate them by where they go... these are for the front knuckles, steering, rear knuckles, etc.

As for the skatepark, there is one but it's run by the county and is fenced off so you have to pay to get in and they aren't always open.
 
Glad to hear you got it in ok. Yeah we have a couple pay to play skate parks around here too. On the other hand I live in Socal, Not but about 5 miles in between the countless small neighborhood skate parks. And the skaters are always down to watch me break my car.
 
Ok new problem. Center diff blew, spitting grease out the side toward the motor. Why has my luck been so bad? Ok so what is the deal with the shims on the diffs? I've built a few diffs but anything I should be looking for? And is 100k in the center normal?
 
Check out the Youtube video How to Bulletproof your differentials for an ARRMA SENTON. It should be by Thomas P RC Extreme. Just follow along step by step. Tower hobbies has the Mugen Seiki E0206 shims in stock right now.
 
Thanks I will check that out. Any idea on the diff fluid for the center? Also is this common for Arrma?
 
I used something between 100k and 500k wt in mine. then like 80k in the back and 50 in the front. Too thick to be honest, but I haven't had to re-build yet, so I haven't swapped out. and yeah 100k is good for reducing front tire balloons, and standing back flips.
 
Ok, I watched the vid and there are two different shims... TD310475 and AR709024, didn't see the mugen mentioned but I guess it's a straight swap for the both in one. Problem with Tower is I wouldn't get it until June 6th at the soonest and I'm not loving them right now with all these breakages... Also I haven't pulled it apart yet but with it slinging grease I assume that a planetary is toasted in there, should I buy the whole thing or just get the gear set? Trying to figure out if getting the whole thing would help with some of the shimming or not... by getting the shims with the new diff and mine in the center diff.
 
I like the E-bay sales for the entire gearbox, and entire differential. My recent issue with the CLICK, just turned out to be a cracked gear box. I had one sitting around because I bought the full gearbox & diff off ebay. I didn't even swap out the differential, I still have that sitting in the wings waiting for the first one to get to old.
 
That's good to know! I haven't taken it apart yet but I thought the center diff didn't have gear box, that's something new for me. I've got an eBay diff on its way as I could only buy a whole diff kit online. The LHS around me don't carry Arrma oh well! So I'll rebuild the eBay one and then see what I need to get in my old one.
 
Old Thread: Hello . There have been no replies in this thread for 90 days.
Content in this thread may no longer be relevant.
Perhaps it would be better to start a new thread instead.
Back
Top